You will have a foundry server running on a remote system that will always be on. You'll have secure https for your connection. It will be a very basic setup. Your certificate will be self signed and probably scary looking the first time you connect, but perfectly good to use for years.
Between $3.25 and 5$ per month
A FoundryVTT licence
Some software to access our server. We will use KiTTY and PuTTY for windows. If you are on macos, you’ll be using PuTTY from homebrew.
Windows:
KiTTY download link: https://www.fosshub.com/KiTTY.html (Get the classic.)
PuTTY download: https://www.chiark.greenend.org.uk/~sgtatham/putty/latest.html (Get the 64bit MSI file)
For mac, with homebrew: sudo brew install putty
Just go ahead and install both KiTTY/PuTTY.
Nice and easy :)
You’re going to buy a Virtual Private Server (VPS). This is a virtual machine with some bells and whistles that lives remotely in a datacenter.
For this guide I’m going to show you how to do it with a low effort digital ocean droplet, a type of VPS. Personally I use a hetzner server, as they are cheaper and offer a tiny bit more, but it’s also a high effort setup that involves sending a scan of your passport and so on.
If you want to go the hetzner route to save some money, the entire guide still applies aside from the details around the digital ocean UI.
Sign up and buy a 5$ droplet from digital ocean here: https://www.digitalocean.com/products/droplets/
Once your payment is completed, you’ll find yourself on the cloud.digitalocean.com dashboard.
Hit the windows key and search for puttygen. Run the application.
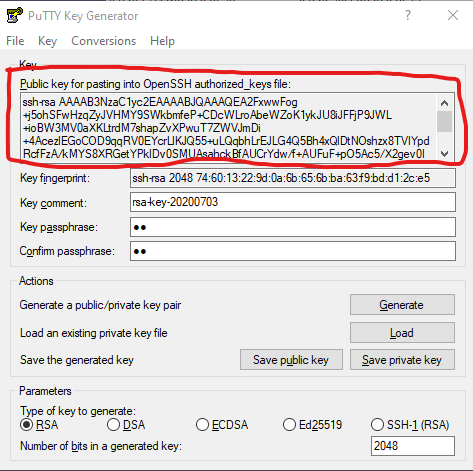
Under actions, click Generate to generate a public/private key pair. Wiggle the mouse around :)
Enter a password in the Key passphrase and Confirm passphrase boxes.
IMPORTANT: DO NOT FORGET YOUR PRIVATE KEY PASSWORD! Ever!
Click Save private key and save it as private_key type .ppk
IMPORTANT: DO NOT LOSE YOUR PRIVATE KEY! Ever!
Right click in text box named Public key for pasting in to OpenSSH authorized_keys file, select all, and copy.
It should look like:
ssh-rsa AAAAB3NzaC1yc2EAAAABJQAAAQEA2FxwwFog+j5ohSFwHzqZyJVHMY9SWkbmfeP+CDcWLroAbeWZoK1ykJU8iJFFjP9JWL+ioBW3MV0aXKLtrdM7shapZvXPwuT7ZWVJmDi+4AcezlEGoCOD9qqRV0EYcrLlKJQ55+uLQqbhLrEJLG4Q5Bh4xQlDtNOshzx8TVIYpdRcfFzA/kMYS8XRGetYPklDv0SMUAsahckBfAUCrYdw/f+AUFuF+pO5Ac5/X2gev0I+uYR1fdCkQh+SjWTgKAgDnoHZry/PWvHQSrwgnvuTQ7a2DX9XM6wOTVj5/tTQxen5hte6/D6Mn9NL12mjGDtgeOZD5DtdyjOMT+sHaLwB+Q== rsa-key-20200703
Nice job :)
Back on the digital ocean dashboard, on the left under manage, click Droplets and Create new droplet
Leave nearly everything default. You may want to change your server’s location.
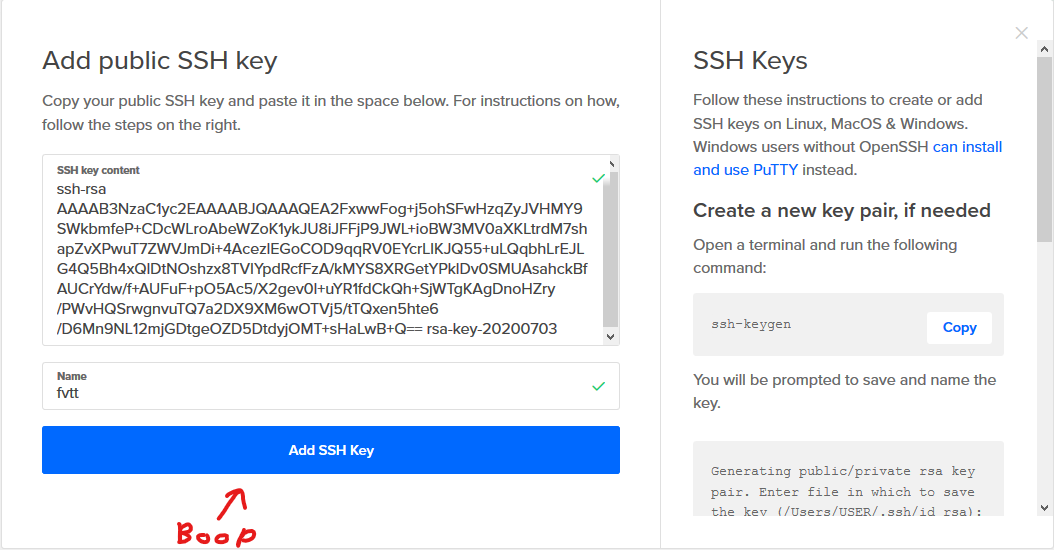
Under Authentication you want to select SSH Keys. Choose New SSH Key.
Paste the key you copied earlier in to the SSH Key Content box. Give it a name, like fvtt or something, and click to Add SSH Key.
Like this:
Under Choose a hostname, just call it whatever you like. I’ll call mine FVTT
Now at the bottom, you can hit Create Droplet :)
You’ll be brought to a new page, where a progress bar will show you your new VPS spinning up! Woo!
Once it’s ready to go, copy the IP address (format of x.x.x.x)
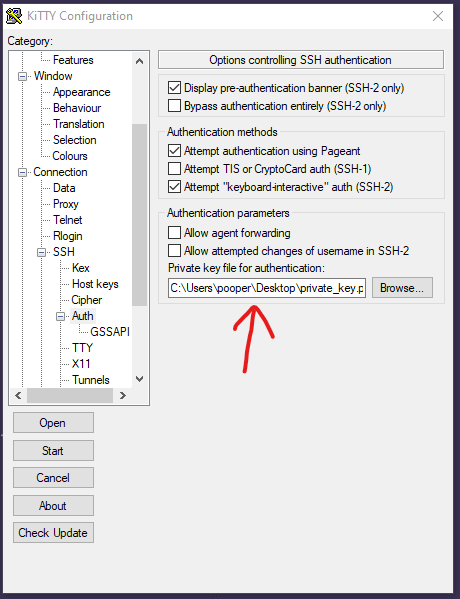
Open KiTTY.
Under Host Name (or IP address) enter the IP of your droplet that you copied.
In the left menu structure, under Connection -> SSH click on Auth. Browse to the location of your private key and use it.
In the left menu, scroll back to the top, hit Session, and on the right hand side, enter a session name and hit save. I’ve named mind FVTT:

Click Open to open a session with the server.
You’ll get some message that the host key isn’t cached. That is fine, press yes. Happens on first connect.
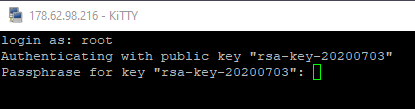
You’ll be presented with a terminal, and a login as: prompt. We’re logging in under the default admin user root.
Then we’ll be prompted for the password we used to secure the private key. You won’t see anything happen as you enter the password. Don’t worry. It’s going in there.
Once we hit enter, we’ll find ourselves logged in!
Lines that start with a $ are commands. Enter them without the $ or leading space. This is true for the rest of the guide. If you see $ lol you should type lol in to the terminal and press enter :)
You can paste in to the terminal window with just a right click.
Add a user. I’m theelous3, so I’ll add myself
$ adduser theelous3
You’ll be prompted to enter a password and a bunch of rubbish info. Add a password and just spam enter through the junk.
Now we give this user a way to do admin things - aka sudo.
$ usermod -aG sudo theelous3
Now we need to set it such that our new user can login to the server.
$ rsync --archive --chown=theelous3:theelous3 ~/.ssh /home/theelous3
being careful to replace theelous3 with your username.
Now log out (just close the terminal), and log back in, using your new username instead of root.
Test this user is working with this command, entering this new user’s password when prompted:
$ sudo ls -la /root
If you see some random files listed, nice!
Update the server:
$ sudo apt update
$ sudo apt upgrade
Accept the default on anything that pops up.
If you have any issues, relog as root and make sure you didn’t miss a step.
I’m going to deviate a little from the actual foundry guide, as I find this more repeatable, simpler, and has much better a troubleshooting story.
Install nvm. Foundry runs on node, a type of javascript. We’re going to install the Node Version Manager to handle all of the node stuff for us.
Go here and get the correct install url. It will look like this:
$ curl -o- https://raw.githubusercontent.com/nvm-sh/nvm/v0.35.3/install.sh | bash
then
$ source ~/.bashrc
Ensure nvm is installed:
$ command -v nvm should output nvm
Install the latest version of node:
$ nvm install node
Ensure node is installed:
$ node --version will output the version.
$ cd ~
$ mkdir foundryvtt
$ mkdir foundrydata
$ cd foundryvtt
Now, login to the foundry site, go to your user profile, and use the link create button beside the node.js software download to create a download for this install.

Back in the terminal:
Replace the PASTE_IN_HERE portion with your copied link, leaving in the ''s!
$ curl 'PASTE_IN_HERE' -H 'Accept: text/html,application/xhtml+xml,application/xml;q=0.9,image/webp,*/*;q=0.8' -H 'Accept-Language: en-US,en;q=0.5' --compressed -H 'Connection: keep-alive' -H 'Upgrade-Insecure-Requests: 1' -o foundryvtt.zip
$ unzip foundryvtt.zip
Replace username and run:
WARNING! DO NOT ENTER YOUR LICENSE KEY YET
$ node resources/app/main.js --dataPath=/home/theelous3/foundrydata
You should see foundry start up :D
Now you can open a browser and go take a look. In the address bar, paste the server’s IP (same as you use in KiTTY) and set the port to 30000, like 178.62.98.216:30000.
Kill foundry with ctrl+c in the terminal window once you’re happy it’s working so far.
If you want to ensure your license key is secure when you activate foundry, and you want to ensure the traffic of your players and yourself are secure from prying eyes, which you should, you’ll want to enable https.
This means we’re going to generate some more keys! Yaaaaaaaay.
Install openssl
$ sudo apt install openssl
Set up the directory structure:
$ cd ~
$ mkdir foundrycerts
$ cd foundrycerts
Generate cert/key:
$ openssl req -x509 -newkey rsa:4096 -keyout key.pem -out cert.pem -days 99999 -nodes
Spam enter to skip junk questions.
This bit is a little tricky. We’re going to use vim to edit the config file, so foundry knows where to find our cert file.
vim is an old school editor, and tricky for noobs. If you follow the keystrokes I lay out exactly you won’t have a problem. If at any point you do have a problem, press esc followed by : followed by q! and press enter to exit, and just start again. If you know how to use vim already, well then you’re fine.
$ vim ~/foundrydata/Config/options.json
Once vim is open, press i. You will see at the bottom it says -- INSERT --. This is good. If it does not, you did not press i.
Replace theelous3 as per usual.
Use the arrow keys to navigate, and replace the null of "sslCert" with the path of your cert, and similarly for the key. It will look like:
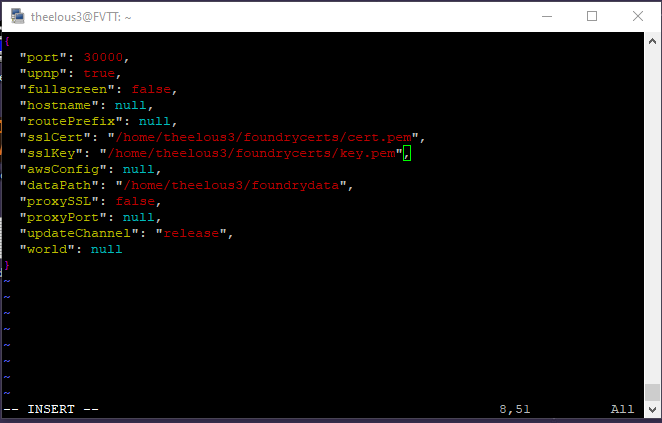
Now press esc then : then type wq and hit enter.
You can verify everything worked by running foundry again with
(Replace theelous3)
$ node ~/foundryvtt/resources/app/main.js --dataPath=/home/theelous3/foundrydata
You should now see both the cert and key have paths in the startup text of foundry:
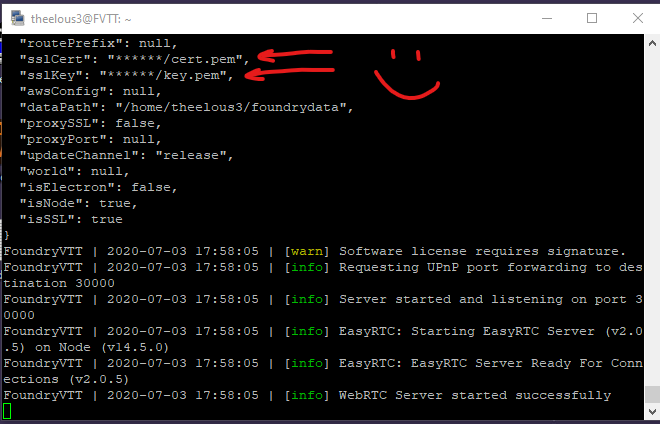
Kill foundry again with ctrl+c
When you close your server connection, processes you have running close too. We want to create a service to keep foundry running even when we close our connection to the server.
Get your node version and make a note of it. You’ll need it in a second.
$ node --version
First we’re going to use vim to create a service file:
$ sudo vim /etc/systemd/system/foundry.service
Press i again to go in to INSERT mode and type the following (you can try pasting it in but vim is kind of weird like that):
Of course, again replace theelous3 with your username. Also, replace your node version. Below, mine is v14.5.0 in the ExecStart line.
[Unit]
Description=FoundryVTT
After=network.target
StartLimitIntervalSec=0

[Service]
Type=simple
Restart=always
RestartSec=1
User=theelous3
WorkingDirectory=/home/theelous3/foundryvtt/resources/app
ExecStart=/home/theelous3/.nvm/versions/node/v14.5.0/bin/node main.js --dataPath=/home/theelous3/foundrydata

[Install]
WantedBy=multi-user.target
It will look like:
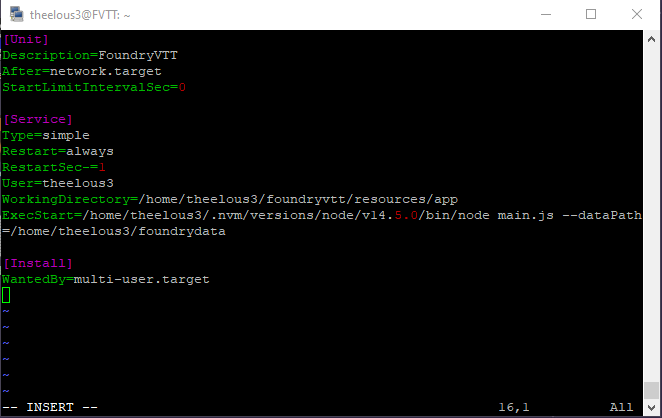
Exit vim as before, esc : wq and enter.
Now start the service
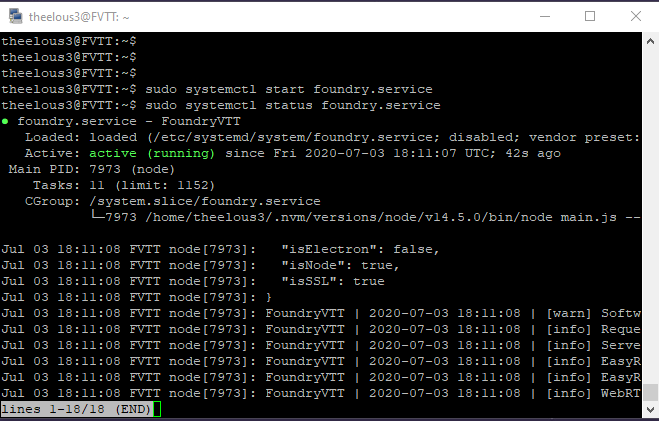
$ sudo systemctl start foundry.service
Check it’s up and running. Press q to exit the status.
$ sudo systemctl status foundry.service
Should look like:
Finally, enable the service so it auto starts any time the server is rebooted
$ sudo systemctl enable foundry.service
aaaaaaaaaaaaaaaaaaaaaand that’s it! Congrats on making it through!
Important! You’re going to get a weird looking warning the first time you connect after we set up the new certs and so on. This is because your server is issuing your browser with it’s own self signed certificate (the one you made for it). Just go to advanced and accept it and continue. We’re not really interested in if it is authentic, because you know it is, you just made it. Our https is just to encrypt all of the traffic between clients and the server, not to try and prove exactly who we are based on the word of a third party.
To connect to your server, go to the following address (replace 0.0.0.0 with your server's IP address) https://0.0.0.0:30000
Like this guide? It cost me five dollaz and a bunch of time I should have been working to make! Feel free to tip at paypal.me/theelous3